

I have to apologize (or do I?) for all of the sweets I've been posting lately. When Valentine's Day approaches each year, I find myself leaning towards desserts more than anything else. You now know the way to MY heart!
I'm guessing there are many of you who would like to save your pennies by cooking dinner at home instead of emptying your pockets to one of those packaged Valentine's "deals" that restaurants seem to hype up. And, since Valentine's falls on a weekday this year, you more than likely will lean to something quick. So, why not plan ahead and make a dessert this weekend that will be ready for you right after that romantic dinner you whipped up? This cheesecake can be made up to four days ahead of time. Just store it in your fridge and pop it out about an hour before serving (if you like cheesecake at room temperature) or just a few minutes before serving (if you prefer it cold, like me).
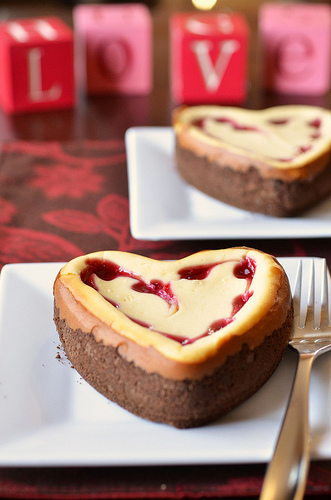
The springform pans I used were clearance items I picked up last year at Target. They are miniature heart shaped springform pans by Wilton. Even though these are only 4-inch pans, and the original recipe is for an 8-inch circular springform, I decided to make the whole recipe and filled a few silicone pans I had with the extra cheesecake to freeze for later. The recipe below reflects the original 8-inch sized cheesecake, with notes added on baking for the 4-inch heart shaped pans.
Another change I made was using regular sour cream instead of the reduced-fat that it called for. Not that I was opposed to using reduced-fat, I just had regular on hand and didn't want to run to the store again. It turned out just fine!
The raspberry sauce is not pictured above, except for the marbled hearts incorporated into the cheesecake filling. To create these hearts, use the same method I showed you for the sugar cookies the other day. Just use the raspberry sauce to create circle drops around the border of the cheesecake, then run a toothpick through them to create the hearts. Simple as that!
Recipe Card
White Chocolate Raspberry Heart Cheesecake
Ingredients
For the Raspberry Sauce:
- 1 (12 oz) bag frozen raspberries, thawed
- ⅓ cup sugar
- 2 teaspoons cornstarch , mixed with 1 Tablespoon water
For the Crust:
- 1 ½ cup chocolate graham cracker crumbs
- ¼ cup sugar , or less to taste
- 4 Tablespoons unsalted butter , melted
For the Filling:
- 3 (8 oz) packages ⅓-less-fat cream cheese (Neufchâtel), at room temperature
- ¼ cup sugar
- 1 Tablespoon cornstarch
- 3 large eggs , at room temperature
- ⅔ cup sour cream (reduced-fat is fine)
- 1 ½ teaspoon vanilla
- 8 oz white baking chocolate , melted according to package directions
Instructions
- Preheat oven to 350 degrees F. Spray an 8×3-inch springform pan with cooking spray.
For the Sauce:
- Set a fine strainer over a small saucepan. Press the raspberries through with a rubber spatula. Discard the pulp and seeds, then stir in the sugar. Heat over medium heat until sugar is dissolved, then stir in the cornstarch mixture. Bring to a boil, stirring until thickened. Set aside and let cool for later use.
For the Crust:
- In a small bowl, mix together the graham crackers and sugar. Pour in the butter and stir until equally moistened. Pat into the bottom of the prepared pan and press up sides about 2 inches (does not need to be even). Set aside.
For the Filling:
- Using the whisk attachment of your mixer, cream together the cream cheese, sugar and cornstarch in a large bowl on medium speed. Scrape down the sides and mix until smooth. Beat in the eggs, one at a time, just until blended. Mix in the sour cream and vanilla until incorporated, then add in the white chocolate. Mix until blended. Pour the filling into the prepared crust.
- Decorate with the raspberry sauce: Starting 1 inch from the edge of the pan, drop 12 evenly spaced ½-inch round puddles of sauce in a circle on the cheesecake filling. Run a toothpick through the circles to create marbled hearts. Make a second and third circle of hearts, going the opposite direction, if desired. Store the sauce in the fridge in an airtight container to serve later with the baked cheesecake.
- Bake the cake for 15 minutes, then reduce the oven temperature to 250?F. Bake for another 1 hour and 15 minutes, or until the center of the cheesecake barely jiggles when shaken. Turn off the oven (leave oven door closed) and cool cake inside the oven for 1 hour. Remove pan to a wire rack to cool completely.
- Cover with plastic wrap and refrigerate at least 4 hours. Remove both cake and sauce from fridge one hour before serving, if you prefer the cheesecake at room temperature. Otherwise, remove the cheesecake just before serving. Run a knife around the edges, if necessary, and remove the sides of the pan. Serve each piece drizzled with the raspberry sauce.
- This can be made up to 4 days ahead.
- Note: If using the 4-inch springform pans, bake only 20-30 minutes at 350 degrees F and 45 minutes to 1 hour at 250 degrees F.
- Source: Adapted from Woman’s Day

Alexander Jacques Sabucido says
Impressive cheesecake recipe that we should try once in a while. Thanks for sharing this great article.
Sydney says
I love the heart swirling idea! I made a plain circular cheesecake and I wanted to jazz it up with that festive technique. However, my cheesecake had a HUGE crack in the middle, and the idea didn't really play out, but oh well. I wish I had some of those heart pans!
Annie says
Beautiful! And starred 🙂
mom44kidz says
These look so delicious!
Liz @ Blog is the New Black says
GOrgeous!
Amy's Cooking Adventures says
Oh my goodness--I think I just died and went to heaven! These look fantastic!
KeepItSweet says
What a beautiful and delicious looking Valentine's Day dessert! I think planning ahead is definitely key for a Monday night celebration.
Jesseca says
This looks so amazing! I love white chocolate cheesecake! I'll be making this sometime next week!!
Thanks for sharing!
happywhennothungry says
This looks so creamy and delicious! Love the heart shape too!