

 Let me start by apologizing for not posting these yet. I've made these countless times since I first discovered them last May. They are a staple in our freezer and I've made them in a variety of sizes ranging from small dinner rolls to medium sized sliders to large hamburger buns.
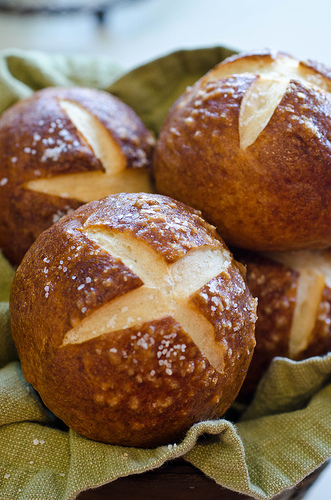
This recipe couldn't be more simple. Dump all of the ingredients (which are few) into a bowl and after kneading for a few minutes you'll have an easy-to-handle ball of dough. After two rises, you then quickly boil the rolls and bake them in the oven. The pretty criss-cross design is simply from slicing a shallow "X" into the dough before baking. Really, it's that easy.
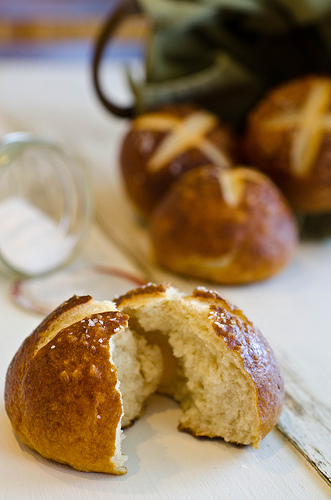 I love these because they are soft and chewy with a salty and somewhat crispy outer shell. If you like soft pretzels, these rolls are right up your alley. Next week I'll share a hamburger recipe using these buns. Can you wait?
Recipe Card

Pretzel Rolls
Ingredients
- ¾ cup water
- 1 teaspoon instant yeast
- 2 ¼ cup flour
- 2 Tablespoons unsalted butter , melted then cooled to room temperature
- 1 teaspoon sugar
- 1 teaspoon salt
- ¼ cup baking soda
- 1 egg , beaten
- Kosher or pretzel salt to top rolls
Instructions
- In a large mixing bowl, combine the water, yeast, flour, butter, sugar and salt. If using a stand mixer, use the dough hook attachment to mix the ingredients, then knead at medium-high speed for 1 minutes. (This will help develop some gluten.) If not using a stand mixer, you can also do this by hand or with a hand mixer fitted with the dough hooks. Shape the dough into a ball and place it back into the mixing bowl. Cover with clean kitchen towel and let rise for 1 hour or until doubled in size.
- Transfer the dough to a lightly floured surface. Separate into 4 to 5 equal portions if making hamburger sized buns or 8 to 10 equal portions if making dinner rolls. Form into balls by pulling the sides to the center and pinching to seal. Place the formed rolls, seam side down, onto a parchment or silicone mat lined baking sheet. Cover with the towel and allow to rise again for 30 minutes.
- Heat the oven to 425F degrees. Bring 2 quarts of water to a boil in a large sauce pan, then add ¼ cup of baking soda. Boil each roll for 1 minute, flipping over halfway. Place the boiled rolls back onto the lined baking sheet, seam side down. Brush the tops with beaten egg, then lightly sprinkle with salt. Slice a shallow "X" into the top of each roll, then bake for 15 to 20 minutes.
- Serve warm or at room temperature. You can also freeze for later use in a freezer bag once cooled to room temperature. Microwave for 30 seconds to thaw. (If not consuming the same day they are baked, freeze right away to preserve freshness.)
- Source: Adapted from The Craftinomicon
Nutrition

Denise says
This recipe is fantastic! I am baking a large batch of them for my brother's graduation/gender reveal party. I practiced them with the par baking method last weekend and it works fantastically. Bake for about 12 minutes, let cool completely and freeze. When you are going to eat them, place on a pan and into the oven before turning it on. The preheating time thaws the bun out and begins to bake it the rest of the time. I check them after about ten or eleven minutes and tap the bottoms for the lovely hollow sound.
Nikki Gladd says
This is great, Denise! Thank you for sharing your tips! Enjoy the party!
Tami says
Hi, Nikki! I wanted to let you know that there is a problem with your site. It doesn't seem to be a problem on my laptop, but when I go from a pin to your blog with a mobile device, this recipe always jumps from the recipe for pretzel rolls to your most current post. Not sure if you can do anything about it, but thought you should know. I didn't test any other recipes, but I do know it is happening with this one.
Nikki Gladd says
Thanks, Tami. Do you mean when you click on a pin for these Pretzel Rolls, it takes you to my homepage? It might be because that particular pin was pinned from my homepage url instead of it's specific recipe url. If this is the case, it isn't a problem with my site, it is because the Pinterest user pinned it incorrectly. If this isn't what you mean, can you email me more specifics? [email protected] Thank you! 🙂
Corrie says
I am thrilled to have found a recipe that most everyone who tries it loves, and these are on the menu for tonight's pulled pork vehicle.
Question: Any thoughts on freezing these in a pre-baked state? I'd love to just have them on hand, you know- pull out and throw in the oven. I'm thinking boil, allow to dry, then freeze. Never tried freezing pretzels before. Have you tried it with this recipe? (Read: Can you save me the heartache of destroying perfectly good carbs? 😉 )
Nikki Gladd says
Hi Corrie! I've had great success in freezing them AFTER baking. If you freeze them right away, they still taste just as fresh when thawed in the microwave. Crazy sounding, I know! 😉 As far as freezing BEFORE baking, I haven't tried it, but I think it would require thawing the dough balls overnight in the fridge before putting them in the oven. So, it really wouldn't be straight from freezer to oven. If you Google around and find a good freezer-to-oven solution, come back and let us know! 🙂
Vicky says
I tried these out last night and was expecting it to be chewy like a soft pretzel. However, they were more like dinner rolls. Super tasty and soft but not pretzel like. Are they supposed to be chewy in texture or soft and fluffy like mine turned out? Here's what I did: I used active dry yeast and added it to the warm water (105-110 degrees) and sugar and let it foam up, then I added the cooled off butter salt and flour and hand kneaded it in the bowl until it was smooth and I could stretch a small piece thin and see a membrane/light pass through, I then created a ball and put it back into the bowl to rise covered in a warm place for an hour. I don't know that I got a good rise out of this though. Then I moved onto portioning out 8 dinner sized rolls and gave them lots of room to rise on a parchment/super lightly floured cookie sheet covered with a towel in a warm spot for 30 min. Again, I don't know that they rose much. I then brought the water & baking soda to a boil at the same time. Dipped each roll one at a time flipping half way through. I used a slotted spatula to pick them out of the water to drain as much of the water off before placing them back onto the same parchment lined sheet. Once all were dipped in the baking soda and boiling water solution I brushed all with the beaten egg, lightly sprinkled with kosher salt and cut a + in the center which turned out slightly smaller than yours looked. Baked in preheated oven for exactly 15 min at which point they were the color of yours at the very bottom. Not as dark as the top part of your roll. Then I left them out for about an hour. The end result was a soft crust, some were a little damp on the bottom, and the inside was light and fluffy. Hopefully you can re-check what I did and help. I really want to try these again! Thanks so much!
Nikki says
Hi Vicky,
Sorry these didn't turn out as you hoped. From the steps you typed out, the first thing that jumped out at me was that you brought the water and baking soda to a boil together. This might have contributed to the rolls being damp on bottom and soft on top and/or the inside texture, although I'm not 100% sure. Instead, try bringing the water to a boil first, then adding the baking soda right before boiling the rolls.
I'd like to direct you to my new favorite pretzel dough recipe that you can follow and then shape into rolls. Here is the original post as soft pretzels: https://www.seededatthetable.com/2012/02/03/homemade-soft-pretzels/
And here is another post that instructs how to shape them into rolls: https://www.seededatthetable.com/2013/01/30/ham-and-cheese-soft-pretzel-sliders/
Hope this works better for you! 🙂
Anonymous says
Thank you so much for taking the time to read and respond to my comment! After I combined the baking soda and water I tried to look up a reference to see if I made a major mistake but couldn't find anything about it. I'm so glad you mentioned that this might be the culprit. I won't make that mistake again. Thanks again, and I'm off to try your recommended recipe and technique!
Miss Evil says
Hi,
I've tried the recipe already twice and I'm still not satisfied. They're always too "rubbery". I assume there is a problem with the cooking and I'll keep trying.
They're tasty anyway and just fine on the inside, so no real loss, but they definitely need more practice and improvement.
Thanks for the great recipe and some day they will be perfect 😉
Nikki says
Hi Miss Evil,
Although I do like this recipe still, I do have a more favorite pretzel roll recipe recently. You might want to try this one out instead: https://www.seededatthetable.com/2013/01/30/ham-and-cheese-soft-pretzel-sliders/ It's great for rolls and soft pretzel twists. I've also done something else with it in the last few weeks that I'll be sharing on the blog soon! 🙂
Miss Evil says
Thank you for the hint, I'm gonna give it a try 🙂
Oh and I like the new design.
Nikki says
Thank you! 🙂
ebethserrano says
I made these last night for some friends, and everyone loved them. Thanks for sharing!
Lindsay Beyerlein says
Have you ever made the dough in a bread maker. Your recipe is one that has the most positive comments I've seen and no comments about errors in the instructions/ingredients. Just curious, I'm a big fan of my bread maker and not kneeding dough by hand.
Nikki says
Hi Lindsay,
I'm sorry, I have never used a bread maker, so I wouldn't have any tips. 🙂
Michelle says
I made these last night and they were sooooo good!! It was a bit tricky getting the risen rolls into the boiling water without deflating them, but I lifted the pan right up next to the boiling water so they didn't have far to go- as soon as they hit the water they start to expand. I also didn't have a knife sharp enough to cut a good cross in the dough without the dough dragging, so I may need to buy an Exacto knife or something, lol! But they were so good and the fam loved. They were just sad it only made 10, so I'll have to double this next time! Thanks!
Becky says
These are amazing! I pretty much never want to use a regular bun again!
Heidi says
This recipe is great! I've been craving a soft pretzel and this fit the bill. It was easy and required no odd ingredients. My almost 4 year old didn't care for them, but DH and I each had 2 warm out of the oven. I agree with some others, the first rise wasn't very high. For the second I put them in a warmed oven with the door open and got a better second rise. Plus after the boil they were bigger. I already have plans to make a double batch for some potlucks next weekend.
I think this will be my new party food recipe maybe make them smaller with honey mustard dipping sauce. Or a cinnamon sugar coating.
Just curious have you ever tried it with whole wheat flour?
Nikki says
Hi Heidi! I think these are a fabulous idea for a party food, made as bites. Really happy you liked them! No, I have not tried making them with whole wheat flour, so no tips on my part for that. Let me know if you try it! 🙂 (I also have a honey mustard recipe on the blog you might enjoy with these.)
Heidi says
I tried the whole wheat, not the best. They didn't get a good pretzel skin on them. I will try again with just a cup of whole wheat and see how they come out. My husband still thought they were good though.
I also did a regular batch as bites and my 4 year old loved them.
Kendra says
I just made the rolls again and they turned out 100% better! I figured out what the problem was. I had used my silpat, and when I tried to pick them up off the mat they stuck a little bit, causing the deflation. Also, I crowded them on the pan when I baked them the first time. I fixed all those issues and they are amazing! Thanks!
Nikki says
Kendra, I love your perseverance! So glad you figured it out. 🙂
Kendra says
Nikki, how do you get them to look so good? When I lifted mine off the pan to drop them in the boiling water it "punched" them down a little bit. By the time I got them out of the water and cut the X on top they had shriveled down a bit. They tasted amazing, but they were not pretty like yours. Am I doing it right?
Nikki says
Hey Kendra. What tool do you use to transfer them to and from the boiling water?
Kendra says
I used my hands to carefully pick them up and drop them into the water, then I used a slotted spoon to get them out. They were beautiful and round before I picked them up, but handling them deflated them.
Nikki says
Hmmmm. That's how I do it, too. It might just take a little practice. 🙂 And, make sure you are not crowding them in the boiled water. (I'm sure you're not, but that could be a culprit as well.)
kristen says
these look SOOO good!
Monika Purpura says
Thank you for this recipe. I am from Germany and I used to buy those at the bakery downstairs. They are called "Laugenbroetchen" over there. Living in the USA so far from home it's just great to find things like that. HAVE to make them this weekend! 🙂
Patches says
Thank you so much for this easy and delightful recipe. I make these once a week now. For home and my ball and chains' work buddies. I had these at a great German restaurant in Kentucky and have been addicted ever since.Hope this New Year finds you and yours health and happy. 🙂
Nikki says
Really glad they've become a staple in your home, Patches! 🙂 My goal is to keep my freezer stocked with them, but once I make them it is very hard not to eat them all within a day or two! lol!
Carolyn says
I made these to go with soup today and they turned out great!!! I will certainly be making these again very soon.
Nikki says
Ooh! I love the idea of dunking these in a slurpy soup!
Stephanie says
I just made these today. They turned out great! I love them! Definitely going to make again!
Nikki says
So glad! They are a football staple for us. (And a birthday staple for the little neighbor boy that requests them every year! *love!*)
Kim says
I made these rolls for deli sandwiches last night. They were amazing! My husband couldn't believe that I made them; that I didn't buy them at the bakery. The recipe wasn't too hard, it just took some time to complete all the steps. But, it was well worth it. I'll definitely be making these again! Thanks for the great recipe!
Amber says
I am definitely going to have to give these a try. I am already picturing a turkey sandwich piled high on one of these beautiful looking rolls.
Valentina says
yummy! and how fantastic for a burger! 🙂
Jen @ BeantownBaker.com says
I love soft pretzels, especially in a roll format. There's a restaurant near us that serves these in their bread basket. SO GOOD. I don't know why I haven't made them myself yet. Thanks for reminding me to do so.
Valerie Blackburn says
I am new to your blog and loving it! I can hardly wait to make the pumpkin butter! I plan on it being a project for tomorrow.
Keep up the good work!
AEB says
These look delicious! Did you use Bread Flour or All purpose Flour? I'm looking forward to trying this recipe.
Nikki says
Just regular AP flour. 🙂
Gena says
It definitely makes it better! I could never get them to brown nicely before. I'll continue to make them this way!!
Laura says
These are incredible! I've seen them in high end grocery stores, and loved them...but never dreamed of making them at home. Can't wait to try these!
Gena says
Mine didn't rise very much either, but other than that they came out great. The other recipe I've used for pretzel rolls doesn't call for the egg wash, and it totally makes the difference!
Nikki says
Hi Gena! Do you mean the egg wash made it better or it is better to not use it?
Kari (Craftinomicon) says
I am totally addicted to these pretzel rolls. I get requests for them at pretty much every pot luck type event we attend. 🙂
Danelle says
I just made these and they are wonderful!! Mine did not seem to rise very much but otherwise they turned out great. I cannot wait to make them again..maybe tomorrow 🙂
Lisa says
I am so excited to see this recipe. About two weeks ago I enjoyed the Red Robin Octoberfest burger that's served on a pretzel roll with ham, swiss, and beer & mustard sauteed onions. I had dreams about that burger and was back within a day a two for a second helping. The pretzel roll totally makes the burger. It was perfectly soft, chewy, and slightly sweet. I was wondering how to recreate this at home. I can't wait to see the next iteration of your pretzel roll recipe so that I can take it for a test run on my own Octoberfest burger.
Nikki says
Lisa - Just a little hint...You are going to be extremely happy to see my burger post next week!! 😉
Kelsey says
These are so pretty, Nikki! I bet ham and Swiss sandwiches with a nice coarse mustard would be wonderful using these. Plus, you know, beer and pretzels are pretty yummy 🙂
Ammie says
I tried pretzel rolls for the first time last month when I was in the midwest and they were delicious. I'm excited to see that they don't look to difficult to make. Yours came out beautiful!
Ty says
I discovered homemade pretzel rolls a few months ago and they are definitely a staple in my house now too. The husband loooovvvveeesssss them.
Blog is the New Black says
One of my first yeasted recipes was this one! It was a hit!
Kim @ Eat What You've Got says
Those look wonderful! I can't wait to try them.