

Click here for an updated version of this recipe, "Better Than Pizza Hut Breadsticks".
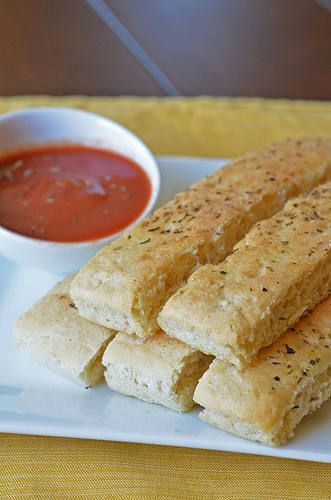
Back when I worked full time in Illinois, my coworkers and I would often hit up the Pizza Hut lunch buffet. Secretly, I was there for the breadsticks. This recipe was compared to the Pizza Hut breadsticks, which is what attracted me to it. I will have to say, they were close as the recipe was written, but not perfect. I added a Parmesan topping to round it out, and now these breadsticks are here to stay. (Note: The photo above is without the Parmesan topping.) Serve them warm out of the oven or at room temperature with your favorite marinara sauce. Perfect-o!
Parmesan Breadsticks
Yield: 3 dozen breadsticks
1 ½ cups lukewarm water
3 tablespoons olive oil, plus additional for drizzling and brushing
1 tablespoon instant yeast
1 ¼ teaspoons salt
3 ½ cups flour
Breadstick Seasoning:
2 tablespoons grated Parmesan
½ tablespoon garlic powder
1 teaspoon garlic salt
1 tablespoon onion powder
1 tablespoon oregano
2 teaspoons dried basil
Lightly spray a half sheet pan (18- by 13-inch) with cooking spray, then drizzle 1-2 tablespoons of olive oil over the bottom.
In the bowl of a stand mixer fitted with the paddle attachment, combine the water, 3 tablespoons olive oil, and yeast. Mix in the flour and salt until combined into a sticky dough, about 1 minute. Transfer the dough to the sheet pan and use oiled fingers to spread to the edges of the pan. Use a pizza cutter or knife to score the dough into eighteen 13-inch strips, ¾-inch wide. Then, score it in the middle, once lengthwise, to create 6 ½-inch long strips. Cover with plastic wrap and let rise at room temperature for 1 hour.
While the dough is rising, preheat the oven to 375˚F. Brush the dough with olive oil. Bake for 25 minutes or until lightly golden. While baking, create the breadstick seasoning by combining all ingredients in a small bowl. Remove breadsticks from oven then brush with melted butter and sprinkle generously with the seasoning.
Once cool enough to handle, cut the dough along the score lines and turn each breadstick on its side. Return to the oven and bake for an additional 5 minutes.
Source: Breadsticks recipe adapted from King Arthur Flour, Breadsticks Seasoning recipe adapted from Savory Reviews.
SK says
Isn't this Paula Deen's recipe from 2005? https://www.food.com/recipe/breadsticks-pizza-hut-style-137629
Nikki says
Hi SK,
They could be somewhat similar, but there are notable differences in her recipe. Anyway, I adapted the recipe from King Arthur Flour and Savory Reviews and cited in the post. Not sure what you're trying to tell me here. Thanks!
Megan says
I followed the directions and brushed them with olive oil. I sprinkled the parmesan seasoning on but while they cooked for the 25 minutes the seasoning almost burnt! The breadsticks are just barely browned-the way I imagine they are supposed to look. I'm not quite sure what I did wrong to have the seasoning almost burn. They were on the middle rack-is that ok? I'm new to baking. 🙂 They smell wonderful so I hope they turn out fine and just look a little off!! I realize this recipe is old but if anyone could help I'd appreciate very much!
Nikki says
Hi Megan, Maybe invest in a oven thermometer to make sure your oven temperature is correct. You can also loosely cover with foil once the seasoning is browned to your liking so it doesn't burn the rest of the baking time. I haven't had this problem, but I think these are the steps I would take if it were happening to me. 🙂
Megan says
Thanks so much! They did taste good despite the seasoning being overly browned. One more question-did you use bread flour or all purpose flour? I'll try the oven thermometer as well. We won't be getting an oven any time soon, but I'm pretty sure the oven the previous owner put in to look pretty is a piece of junk!!
Nikki says
I use all-purpose flour. 🙂
Nikki Gladd says
UPDATE: 9 years later... 😉 We do wait and sprinkle the topping on AFTER removing the breadsticks from the oven.
Penny says
I don't put on the topping until AFTER the bread sticks are baked. I brush them with melted butter right out the oven and then sprinkle on the topping. Learned this from a person who used to work at Pizza Hut. This is what they do. That will prevent any burning of the seasoning. They taste amazing!
Nikki says
Thanks, Penny! I might try that myself sometime!
Nikki Gladd says
UPDATE: Thank you, Penny! This is what we do now!
tina says
Were having a birthday party this weekend with pizza , these will be a great addition
Lisa says
Look super yummy! Have you tried freezing these? Would that be okay? I just don't see us needing that many at one time.
Nikki says
Lisa,
No, I haven't tried freezing these yet, but it is something I've considered. I think it would work to freeze after baking them, wrapped individually in plastic wrap then placed in a freezer bag. (You probably don't even need the plastic wrap, but it will help fight any frost.) Warm it in the oven when ready to eat.
Nikki Gladd says
UPDATE: Yes, these can be frozen simply by placing the cooled breadsticks in a freezer bag. Reheat in a 350 degree oven until heated through.
Chrissy says
These look SO good!! Perfect for a carb lover like myself 😉
Liz says
Those look SO perfect!!
Amy's Cooking Adventures says
Ohhhh...now I'm craving some pizza! Thanks for the recipe!
Divya Vikram says
Perfectly shaped breadsticks. love them!
Blog is the New Black says
These look so tasty!
Kelly says
These look amazing!! I love Pizza Hut, too!!
Cassie says
These look great. Thanks for the recipe.
katie says
I haven't had a Pizza Hut breadstick in years, probably since the dorm food in college. These look great and a lot less greasy. I cannot wait to try them.