

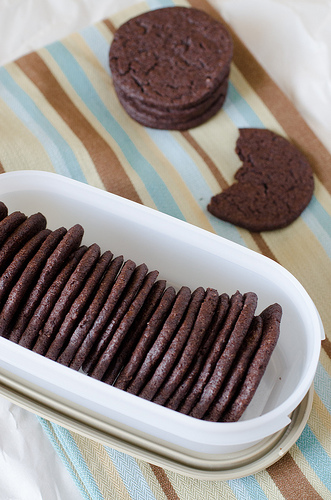
 I have big plans for these cookies. Not only are chocolate wafers amazing as is, they can be used in many variations. My first batch of these were kept in the freezer, waiting for me to munch on them...pretty much daily...until they were gone. Then, I went crazy and made these...
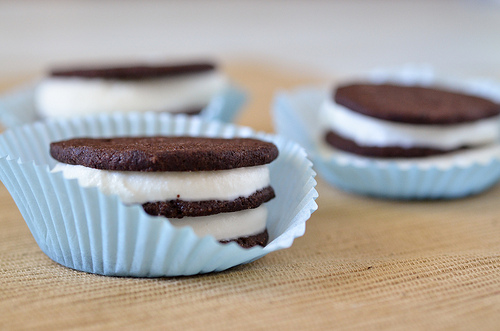 The hubs gets excited when he comes home from work and finds something like this in the freezer. Homemade vanilla ice cream sandwiched in between chocolate wafers? I won his heart all over again. He ate all three of them, leaving me not even a crumb, but then told me they were goo-ood.
The store-bought chocolate wafers can be pretty pricey, so I'm ecstatic to have a homemade recipe. Next week I'll share another way I put these cookies to use. But, until then, consider making these soon and mashing them up into your ice cream, dunking them in some coffee or milk, or go the extra step and make an icebox cake! Then, again, you can just do what I did and savor them slowly one by one.

Recipe Card

Homemade Chocolate Wafers
Ingredients
- ½ cup (8 tablespoons) unsalted butter, room temperature
- ¾ cup sugar
- ½ cup packed dark brown sugar
- 1 teaspoon pure vanilla extract
- 1 cup all-purpose flour
- ¾ cup Dutch processed cocoa powder
- ½ teaspoon baking soda
- ¼ teaspoon salt
- ¼ cup milk
Instructions
- In a large mixing bowl, cream together the butter, sugars and vanilla until light and fluffy, about 2 minutes. Meanwhile, in a separate medium bowl, whisk together the flour, cocoa powder, baking soda and salt.
- Combine the dry ingredients to the butter mixture and stir until incorporated. Pour in the milk and mix until just combined.
- Transfer the dough to a clean workspace and form into two 1+½-inch logs. Wrap tightly with plastic wrap and refrigerate for at least 1 hour.
- When ready to bake, preheat the oven to 350 degrees F and line two baking sheets with parchment paper or silicone mat. Use a serrated knife to slice the cookie dough into ⅛-inch discs, working with one log at a time and keeping the other in the fridge until ready to slice and bake. Place the discs on the prepared baking sheets.
- Bake for 8 minutes, rotating the pans halfway through. Allow the cookies to cool on the pans for 5 minutes before transferring to a wire rack to cool completely.
- Recipe Note: These cookies can be frozen.
- Source: Adapted from Zoe Bakes

Denise says
These are delicious! I just made them - half will be ice cream sandwiches and the other my midnight snack with a glass of milk! I gave it 4 stars only because they crumbled as I sliced them. I ended up rolling slightly thicker slices into balls, putting them, a few at a time, in between plastic wrap and pressing flat with a glass bottom. Easy to take off the plastic and put on parchment, but took a little more time. Definitely a keeper recipe. Thank you!
Patrick says
I love these, so does the wife. Adding orange extract also gives them a great additional flavor.
Suzanne says
This looks so good! What a great combination of flavors!
Andrea says
Do these spread somewhat? I’m making a dessert that calls for chocolate wafers and no one has them. I need them to fit the bottom of a regular muffin tin.
Nikki Gladd says
Hi Andrea, They spread just a little during baking. So I suggest forming the log so the diameter is just a little smaller than the bottom of the muffin tin. Hope this helps!
J.Kern says
These cookies are the best and so simple to make. The hardest part is waiting for the hour in the fridge!
Nikki Gladd says
haha! Thanks! I agree, that is definitely the hardest part!
J Kern says
Making these again for probably the millionth time. Trying gluten-free flour today as we just found out our daughter is non-celiac gluten sensitive!
Fingers crossed they come out as good as the recipe is written so thankful for good recipes!
Nikki Gladd says
Oh yes! Let us know how they turned out!
J Kern says
I am glad to report the gluten-free version is just as good as the original recipe. Thank you so much for sharing your delicious treats with everyone! ❤️
Nikki Gladd says
That's great news! Thanks so much for letting us know!
Alicia says
I wish you could see how hard it is to read this recipe when there's a big ad at the top of the page that I can't click off and another ad at the bottom of the page that I can't click off
Nikki Gladd says
To read the recipe without ads, click "print recipe" and you can read it from your phone in print view.
Anonymous says
UPDATE: My kiddo is now gluten and dairy free -this recipe still works great subbing with BOBS RED MILL 1:1 Baking flour and almond milk ❤️
Nikki Gladd says
Awesome! Thanks for the tip!
Kris says
I ran out of store bought chocolate cremes for my vanilla ice cream so I made these for the first time! They are easy to make and taste delicious for cookies and cream ice cream and by themselves. Perfect midnight snack! My little 1 year old cookie monster loved them too!
Nikki Gladd says
This makes me happy, Kris! I'm also now craving cookies and cream ice cream!
Tory says
These are fantastic! My husband loves them. They really are very thin, crispy and chewy. I'm going to add finely chopped walnuts next time and plan to make the incebox cake for his birthday. These are ao simple to make, one of my new favorites. Thanks!
Nikki Gladd says
Great idea to add walnuts. Cannot wait to hear how the icebox cake turns out! 🙂
mary brandt says
Can you add ground up nuts to the recipe. Thank you.
Nikki Gladd says
Hi Mary, I have never tested this idea so can't say for sure.
Marisa says
They taste amazing! I've used these as a base for cheesecake. I just cant get them to be really crisp. Should I bake for longer?
Nikki Gladd says
Hi Marisa,
I'm glad you love the taste of these wafer cookies! You can try baking them a little longer to make them crispier. It is also possible your slices are a little thicker than mine, and baking longer will help. My other recommendation is to bake at a higher temperature...maybe 25 degrees more than the recipe calls for in case your oven temp varies from mine. 🙂
Patti Roy says
Is the 1 1/2 inch logs correct? Are these like mini cookies? Do you think they would still crisp up if I made them a bit bigger?
Nikki Gladd says
Hi Patti, The recipe is correct as written. You can try making them a little bigger but they also spread a little bigger as they bake. Thanks!
Anon says
Is the 3/4 cup sugar mentioned white sugar?
Nikki Gladd says
Hi Anon, Yes. White granulated sugar.
Silvi says
Made these and they were so good... Everyone loved them... I have some dough in the freezer ready to cut up and cook when we need some... I did not fill them as we love them plain....
Anonymous says
This is exactly what I was looking for. thank you!!!!!!!
Can't wait to try them out.
Michele says
These are the best cookies I have ever tasted!! I have been baking for more than 40 years,I have been looking for a cookie like this for years.Finally came across your blog,I am new to all of this website technology ,but gld I found you here,thanks so much,I think I ate almost all of the cookies by myself,my husband,& granddaughter also,loved them,will be making them again this week,I don't want to gain too much weight 😉
Thanks again. Will be making ice cream sandwiches too!!!
Nikki Gladd says
Thank you, Michele! So glad you liked them and came back to let me know! 🙂
Nicole says
Love love love these cookies!!!!!!! I use them all of the time and everyone is impressed! Being the newlywed I am, I try to find things off the beaten path that are thought to be hard but are really quick and easy. I these are the perfect for ice cream sandwiches!!!! I use these at least once a week! I throw the dough in the fridge, get my ice cream churning pop it in the freezer, slice and bake off cookies, by the time the ice cream sets, the cookies cool. Assemble and serve. I have not found another cookie that works as well! Thank you!
Nikki Gladd says
Thanks, Nicole!! So fun to hear how you use them! 🙂
Michele says
On a whim I decided I wanted to make ice cream sandwich cookies today and came across this recipe. I did have trouble with slicing the logs, they crumbled as I sliced...but I just reformed them into discs and they baked up perfectly. The texture and taste is exactly what I was looking for!
Mali says
Came out wonderful! Perfect for the icebox cakeor today's BBQ. Pinned this recipe, definite go-to chocolate cookie recipe.
Nikki Gladd says
So great! Thanks, Mali!
lynn says
Hi, I love this recipe...my family absolutely adore cookies with potentials *lol* (yeah they have it more than 3 ways). But I have a question, how do you keep the cookie shape round because mine came out not so round...I've tried turning the cookie log every now and then but there gotta be some other way....
Nikki says
Hi Lynn,
If one side ends up a little flatter after refrigerating, I lightly re-roll it to even it out before removing the plastic wrap. Hope this helps!
AA says
Can this dough be rolled to cut out cookies?
Nikki Gladd says
I think it could, but I've never tried.
katie says
could this be done with Soy butter and soy milk?
Nikki says
Hi Katie, I'm not experienced with using soy products, so I can't really give you an educated answer. Sorry!
Ainsley says
I tried this recipe over the weekend. They are delicious! However, I couldn't seem to get them crispy enough. They were still a little soft in the middle. If I wanted to eat them alone, they are perfect, but I wanted to use them to replace Nabisco's famous chocolate wafers. I followed the directions and baked for 8 minutes, then 8 minutes more. They still didn't crisp up in the center.
I also had some trouble slicing the dough after refrigerating overnight. It seemed to want to crumble.
Julie says
I served these with lemon mousse (cream, whipped, mixed with lemon curd). Sooooo good! Thanks for a great cookie!
Donna says
Thank you so much for providing me with a recipe for the bottom of various cheesecakes...I was so needing this...as in France I have never actually seen the chocolate wafers one can buy in the store..and I imagine these are a million times better...Just mark me "grateful"!! Lovely blog by the way...the yellow cake mix recipe has been bookmarked as well..as the boxed variety is difficult to find and extremely expensive as well..
Nikki says
Thanks, Donna! Very glad you're here and that I could help! 🙂
Nisha says
Perfect. Just perfect. Definitely making these wafers.
I'm bookmarking this because it's an eggless recipe, just what I wanted!
Ashley B says
Made homemade ice cream cupcakes last month and thought chocolate wafers would be nice to make the "crunches" that's in Carvel Ice cream cake but couldn't find the wafers any where.....this recipe will def get some use
Nicole @ Atlas Grace says
Yum! Found these via Pinterest and they are *just* what I was looking for. Going to dip one side of each cookie in chocolate and serve at a tea party.
Georgia says
I am copying this recipe now. I love chocolate wafer cookies just to eat. I read in a blog (don't remember which one) where they used chocolate animal crackers for their crushed chocolate cookies - instead of these expensive wafers or Oreos. I bought a bag of them at Wal-Mart and they are really good snacking crackers too.
Nikki says
Hi Georgia! I don't think I've ever seen chocolate animal crackers, but they sound delicious! 🙂
Julie @ Table for Two says
this is so awesome! i may or may not be making this this weekend 😉
Emily @ She Makes and Bakes says
These look unbelievable. Mmmm. I'm imagining these with some buttercream. And now I'm drooling. Adding these to the bucket list!
Valerie Wilson says
Are they crunchy or soft??
Nikki says
Hi Valerie, They are crispy, then become soft when refrigerated. 🙂
Valerie Wilson says
Thanks for answering, Nikki. They sure look yummy!
Holly says
Sounds like they'd make a good replacement for oreos in a crumb base for desserts.
Cookbook Queen says
I LOVE using these in recipes but they are very hard to find around here. Thrilled to have the recipe now!!
Nikki says
Woot! So glad to be of assistance to you, my dear Queen! 😉
Jessy says
What a great recipe to have on file!
Love this!
Katrina @ Warm Vanilla Sugar says
Oh my! These sound awesome!