• Skip to primary navigation
  • Skip to main content
  • Skip to primary sidebar
  • Home
  • Picnic Food
  • More Recipes
    • Breakfast
    • Easy Dinner Recipes
    • Appetizers/Snacks
    • Side Dishes
    • Best Dessert Recipes
    • Cookies
    • All Recipes
    • Categories
  • Travel
  • Shop

Easy Recipes for Family Time - Seeded At The Table logo

menu icon
go to homepage
search icon
Homepage link
  • About
  • Picnic Food
  • Cookies
  • Easy Dinner Recipes
  • All Recipes
  • Travel
  • Shop
  • Contact
×

Home » Course » Breads » Homemade Pita Pockets

August 6, 2012

Homemade Pita Pockets

This post may contain affiliate links. Read my disclosure policy.

Pin
Share
Tweet
Share
46Shares
Jump to Recipe

Pocket PitasHave you ever run into a recipe that was somewhat of a failure, but good enough to eat even though you couldn't use it for what you originally intended?  Such was the case with this pita bread.  I had to make these four times before they finally puffed to where I could actually put them to use as pita pockets.  Frustrating, for sure.  But a great learning process.

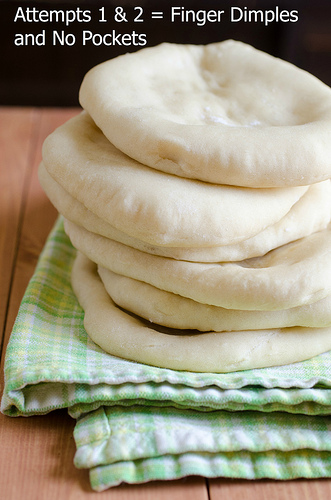
After two attempts, I realized the first glitch in the original recipe.  It instructed to roll the discs out using a rolling pin or by hand.  I opted for the hand route, then realized that by using my hands/fingers the dough was being pressed too hard in order to delicately puff in the oven.  Parts of the pita did rise, but there were dimples all over the surface that screamed "finger prints!"  So, attempt number 3 had me shaping the dough with my rolling pin instead.

Pita Bread
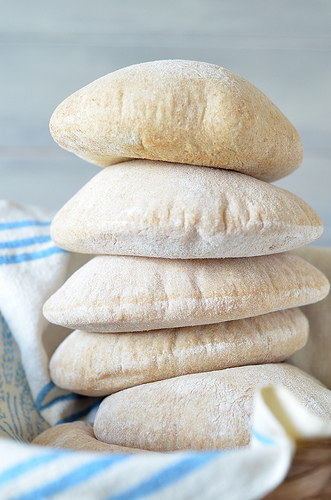
Attempt number three was partially successful.  Probably about half of my pitas puffed perfectly, while the others did not puff at all. Whaaatt?!?  After a little research, I found that I should raise the temperature a bit, and also allow the oven to reheat briefly between batches.  Once I got this right, the pitas and I were on the same page.  I gave them the tender care they needed, made the temperature right, and they puffed beautifully for me in return.Pocket Pitas 2
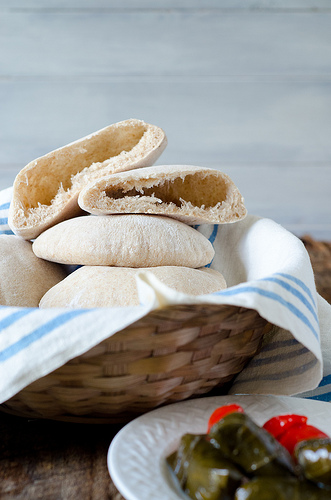
Don't be discouraged if these do not turn out exactly right for you the first time.  All kitchens and ovens perform differently, and sometimes recipes (especially bread ones!) take some practice.  At least with this one the bread will not go to waste, since you can use the flat bloopers as a sandwich wrap, pizza crust or dip them into yummy hummus.

Other pita recipes I found helpful:

Brown Eyed Baker
The Fresh Loaf
Veg Recipes of India

Recipe Card

Print Recipe
No ratings yet

Homemade Pita Pockets

Prep Time1 hour hr 45 minutes mins
Cook Time15 minutes mins
Total Time2 hours hrs
Servings: 8 -9 pitas (16 servings)
Author: Nikki Gladd

Ingredients

  • 1 ¼ cup warm water (not hot)
  • 1 package instant yeast (about 2 ¼ teaspoons)
  • 1 Tablespoon sugar
  • 2 Tablespoon olive oil
  • 1 ½ cups whole wheat flour
  • 1 ½ cups all-purpose flour
  • 1 ½ teaspoons salt

Instructions

  • Mix water, yeast, sugar and oil in a small bowl; set aside. Whisk together the flours and salt in a large bowl. Pour in the yeast mixture and mix together with wooden spoon until dough forms. If using a stand mixer, use the dough hook attachment to knead at medium speed for 10 minutes. Alternatively you can knead by hand for 10 minutes, until dough is smooth and elastic.
  • Transfer the dough to an oiled bowl, turning to cover with oil. Cover bowl tightly with plastic wrap or kitchen towel and let rise in warm place until doubled, about 1 hour.
  • Punch down dough and transfer to clean work surface lightly dusted with flour. Form 8 to 9 dough balls, cover with clean damp towel or plastic wrap and let rest for 20 minutes.
  • Working with one dough ball at a time on a clean and lightly floured work surface, use rolling pin to shape into about a 6-inch disc (or just smaller). Do not roll too thin. Place on a greased or lined baking sheet, cover with clean kitchen towel and let rest at room temperature for 10 minutes.
  • Preheat oven and baking stone to 450 degrees F. Bake 2 to 3 pitas at a time for 5 minutes. They should puff at around 3 minutes. When removing pitas from oven, do not remove the stone so to keep the stone hot. Wait 2 minutes before baking the next batch, to allow the stone to reheat to the correct temperature.
  • The pitas are best the same day they are baked. To preserve their freshness for another day, once they are cooled to room temperature, transfer to a freezer bag and store in the freezer for up to 2 months. Defrost in the microwave for about 20-30 seconds.

Notes

These pitas puff up beautifully so that when you slice into them they have the perfect pocket you need for your favorite gyro. You can alter the variation of flour used (e.g., use only all-purpose flour, or all whole wheat, or another combination) but my favorite is listed above.

Nutrition

Serving: 1g
Tried this recipe?Take a pic and tag @seededtable or #SeededAtTheTable to be featured!
Pin
Share
Tweet
Share
46Shares
« Chocolate Hazelnut Surprise Cookies + A JIF Giveaway! - CONTEST CLOSED
DIY Homemade Yellow Cake Mix »
Seed at the table family photo

About Seeded At The Table

Thanks for visiting! We’re the Gladd family! We love donuts, Disney, LEGO and Jesus. Not in that order, of course. 🙂 Ben shares DIY wood-working projects and Nikki shares delicious recipes. You’ll also find a sprinkling of travel adventures and other family fun ideas!

Learn more about me →

Reader Interactions

Comments

  1. Fatma says

    August 04, 2013 at 5:50 pm

    They are really perfect. I tried them several times. Thank you very much.

    Reply
  2. April says

    January 13, 2013 at 8:28 am

    I'm going to try this recipe out tonight! I looked over the net and it seems most recipes mirror this one so I'm feeling good about it! I think I will do the dough portion in the bread machine though since I already made 2 things with my mixer yesterday (including loaf bread) and am a bit mixed out! I'll let you know how it turns out!

    Reply
    • april says

      January 13, 2013 at 6:45 pm

      Oh. Wow. That was amazing!!! Bread machine worked perfectly and the lira's were light and fluffy and so soft. So good!!

      Reply
  3. Jean says

    October 02, 2012 at 7:03 am

    I was wondering if it is necessary to have a baking stone to bake these or if just a baking sheet would work as well.

    Reply
  4. Sweetsugarbelle says

    August 09, 2012 at 9:22 am

    These are wow! You're not kidding about things like pitas taking practice...I admire your bravery for even trying. In any case. You're right. Anything dipped in hummus is GOOD!

    Reply
    • Nikki says

      August 09, 2012 at 2:27 pm

      Thanks, Callye! xoxo!

      Reply
  5. Gerry @ Foodness Gracious says

    August 08, 2012 at 12:41 am

    Fantastic! I love your determination to get them just right,
    Great post..

    Reply
  6. Casey says

    August 07, 2012 at 10:41 pm

    I think it is great that you kept trying until you got something really special.

    Reply
  7. Christina @ Sweet Pea's Kitchen says

    August 07, 2012 at 9:17 pm

    Your pitas look amazing! I love having gyros for dinner but I usually just buy the store bought pitas to save time. These pitas look like they would be worth the effort! 🙂

    Reply
  8. Candy G. says

    August 07, 2012 at 11:38 am

    I would love this straight off the spoon!!!!!

    Reply
  9. Tara @ Musical Soup Eaters says

    August 07, 2012 at 11:13 am

    These look wonderful. Your timing is perfect--I have been planning to start making homemade versions of foods I would normally buy. I bet that these taste a lot better than store bought pita bread, especially when they're fresh.

    Reply
    • Nikki says

      August 08, 2012 at 2:36 pm

      Hi Tara. They definitely taste better than store bought, and yes, especially when fresh. (Which is why if I don't use them right away, then I bag them up and freeze them.) 🙂

      Reply
  10. dassana says

    August 07, 2012 at 8:58 am

    the pitas are looking like wonderfully fluffed pillows.... thanks for the mention nikki.

    Reply
    • Nikki says

      August 08, 2012 at 2:37 pm

      No problem, Dassana! Your recipe is the one that really got me in the right direction! 🙂

      Reply
  11. Kristen says

    August 07, 2012 at 7:59 am

    I loved realizing I can make my own pita bread... so good!! Yours look beautiful!

    Reply
    • Nikki says

      August 08, 2012 at 2:37 pm

      Thanks, Kristen!

      Reply
  12. Jessica @ Sunny Side Up says

    August 07, 2012 at 6:18 am

    Are you reading my mind?! I have been thinking of making pitas a lot lately. This recipe and your ideas are just the nudge I need!

    Reply
    • Nikki says

      August 08, 2012 at 2:37 pm

      Of course, Jess! I'm always reading your mind...duh! 😉

      Reply
  13. Julie @ Table for Two says

    August 06, 2012 at 9:10 pm

    yours turned out so gorgeous!! third time's a charm, eh?

    Reply
  14. Suzanne Perazzini says

    August 06, 2012 at 7:23 pm

    Thank you for doing the testing so we don't have to. I have never tried to make these and since I have an unreliable oven I'm not too sure how they will turn out. But God loves a trier.

    Reply
  15. [email protected] says

    August 06, 2012 at 2:10 pm

    I've had problems with homemade Pita Bread, too. You just have to be really careful. However, I rarely use mine with the pockets opened. I use them for pizza crust; pita chips; open face sandwich; folded like a taco; sometimes split horizontally; and sometimes I put butter, garlic salt and cheese on them, heat them, and cut them in triangles for bread.

    I think they're worth making even if you can't open them and use the pockets.

    Reply
    • Nikki says

      August 06, 2012 at 2:49 pm

      Hi Patty. I agree. This isn't the pita bread recipe that I would use for flat pita bread, which is why I decided to title these Pita Pockets instead of pita bread. 🙂 But, if they fail to give pockets, then definitely use them for the examples you gave (and I also gave some of the same in my post above.) Thanks!

      Reply
  16. tanya1234 says

    August 06, 2012 at 6:30 am

    have to try thankxxxxx

    Reply
  17. Katrina @ Warm Vanilla Sugar says

    August 06, 2012 at 6:05 am

    So fun! Great idea!

    Reply
  18. Erin @ Texanerin Baking says

    August 06, 2012 at 4:31 am

    Good for you for not giving up! I don't like gyros but I do love to eat plain pita. Just give them to me empty and I'll happily munch away until someone stops me. You got some wonderful puffiness with yours! Very pretty. 🙂

    Reply

Leave a Reply Cancel reply

Your email address will not be published. Required fields are marked *

Recipe Rating


This site uses Akismet to reduce spam. Learn how your comment data is processed.

Primary Sidebar

Search for Recipes

© 2023 · Seeded at the Table · Home · About · Contact · Privacy Policy