

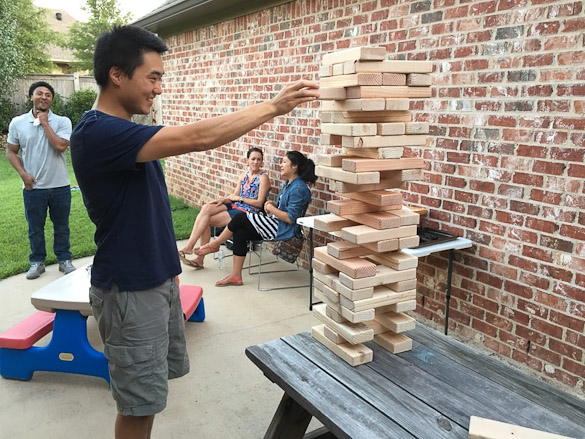
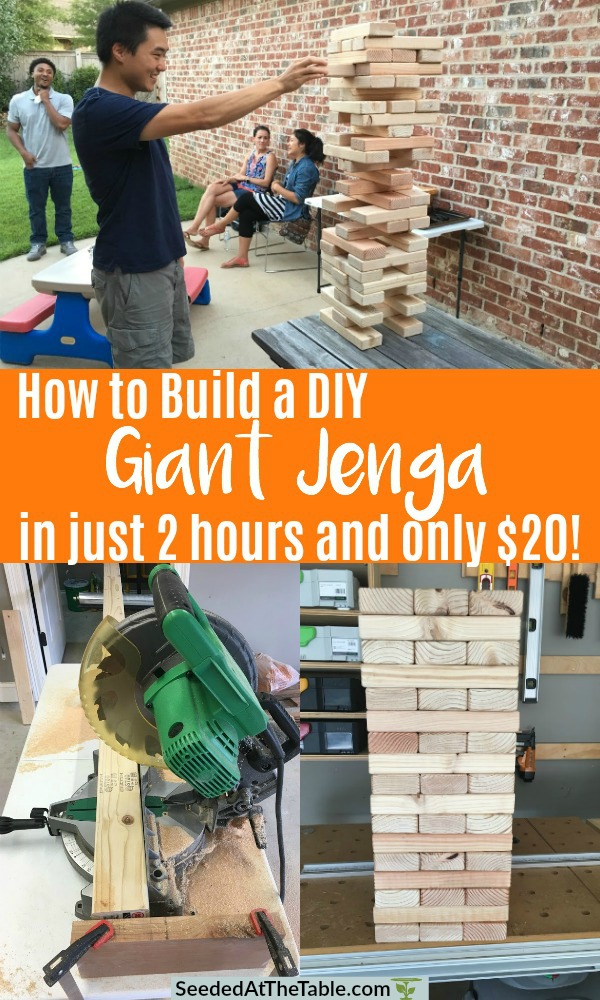
Surprise! Ben is guest posting today! He is sharing with us how to make a Giant Jenga game that you can play in your yard or on your patio. Ben, take it away!
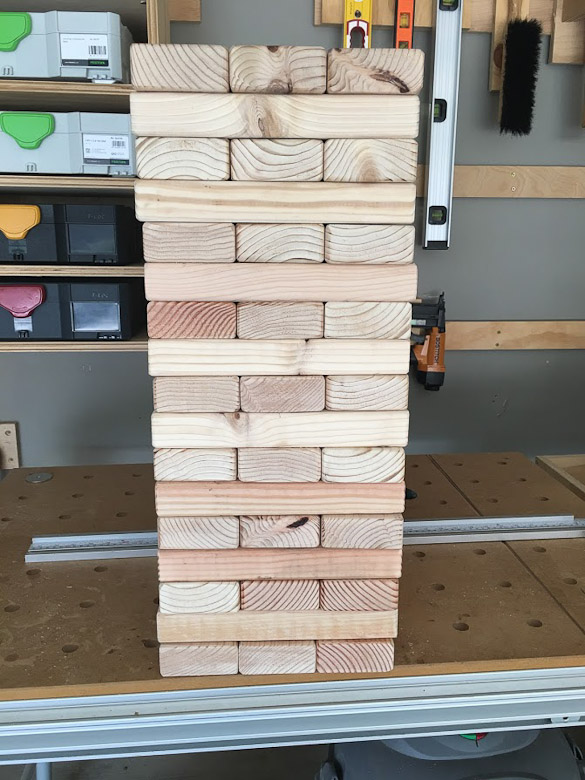 Hey guys! I built this Giant Jenga game within only two hours. You can do it in less time if you decide you don't want to sand it. But, I encourage you to not skip the sanding part because this is what makes the pieces slide easily and you avoid splinters. These large Jenga sets retail for upwards of $100. You can make it for $20.
Here is the step-by-step with photos:
Materials:
6 2x4’s (8 feet long)
Sandpaper (180 grit)
Tools:
Mitre Saw
Adjustable roller stand
Clamps
Spindle, orbital, or belt sander
Safety Supplies:
Glasses
Ear protection
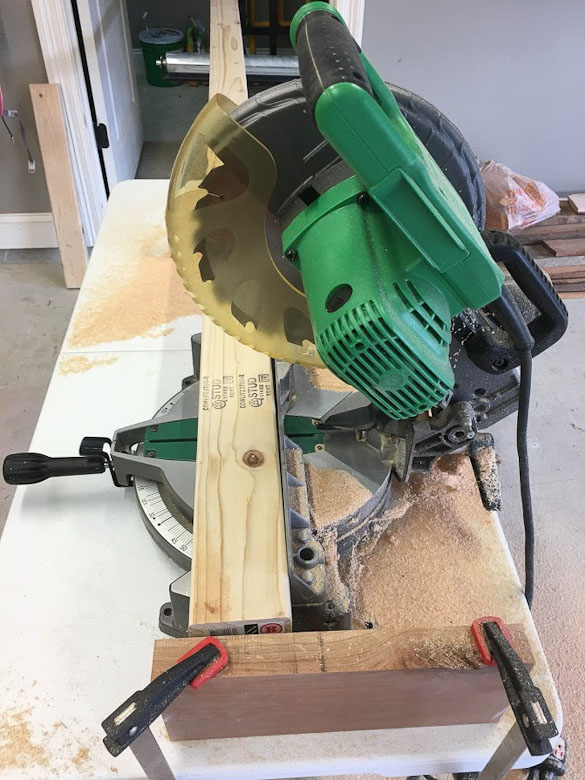
Step 1: Cut the 2x4’s
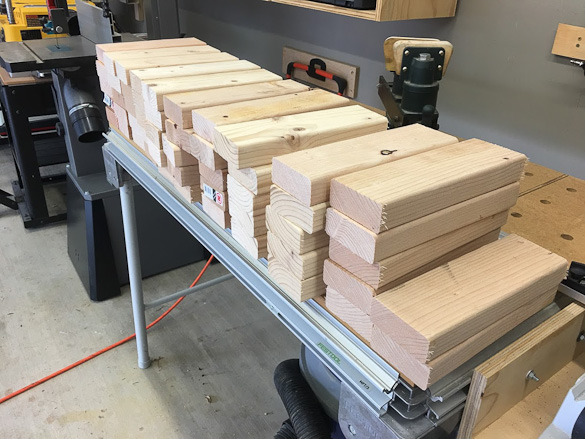
After purchasing the 2x4’s from Home Depot (around $18), I setup my Makita mitre saw on a portable table in my garage. Cutting an 8-foot long 2x4 it’s a bit tricky to maintain the board level with the saw, so I suggest using an adjustable roller stand. Once the 2x4 is stable on the mitre saw, setup a stop for making repeatable cuts. This will allow you to cut the exact same size without the hassle of measuring every cut. I used a scrap board and two clamps to create my stop. Once the stop is in place, cut 54 piece at 10 ½”. This step will take only a matter of minutes with the help of the stop!
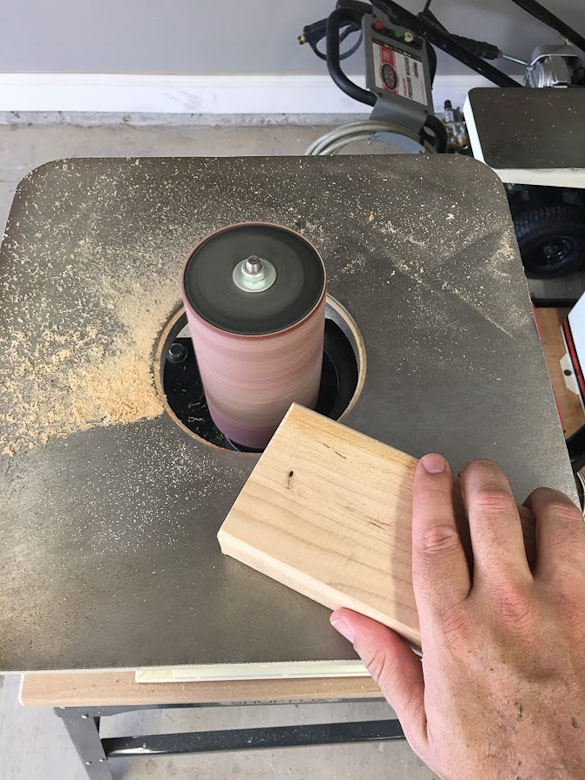
Step 2: Sand, sand, sand
Now that we’ve cut 54 blocks, we need to sand each of them. I could have used an orbital belt sander, but I decided to use my Jet spindle sander. I don’t have a belt sander, and an orbital sander will take much longer. To prevent splinters, I was careful to sand each side of the block. It took me about 45-60 seconds per block, and with 54 blocks, the sanding process took about an hour.
Step 3: Have fun!
(Inspired by DIY Pete)
Pin this to your favorite DIY Board

Anonymous says
Use Minwax paste wax to help them slide smoothly.
Anonymous says
What’s the math behind the cuts ? I want to make it with a 4x4
Anonymous says
the pieces are 10.5" long and if you wanted it the same height(roughly) you would need half the amount so 27 pieces. to adjust the height just add or subtract 3 pieces.
Anonymous says
I know I'm late to the post, but I'm not seeing that anyone answered you thoroughly. To get the length of the boards, you'll have to first measure the width of the boards. Typical 2x4's are actually 3 1/2" in width, so you'd multiply 3.5 x 3 (or amount of blocks you want in a row) and you'll get the total length you should make your boards. In this case, 3.5 x 3 = 10.5"/board. Typical 4x4's are actually 3.5 x 3.5, so the measurement of the length would be the same for you.
Logan says
I blog frequently and I really appreciate your information. This article has truly peaked my interest. I will take a note of your blog and keep checking for new information about once a week. thanks for sharing and keep on sharing more stuff.
Michelle says
Super easy! Just gotta have a miter saw, which I don't have... 🙁
I guess I could use my hand saw but that would take a little longer than 2 hours I think 😉
Nikki Gladd says
I know what you might add to your Christmas wish list! 🙂
Brad Raper says
Rented one from Home Depot- 29 dollars for 4 hours
Much easier!
Melinda Rusaw says
I cut my piece carefully, sanded them all (it took a loooong time) with an electric pad sander, they look great, but they don't slide easily at all. Only a few do. I'm thinking I'll sand them all again with a finer grit?
Nikki Gladd says
Hi Melinda! Ben said to sand it with at least a 220 grit. (I have no idea what that means as he's the handy one, but hopefully you do!) 🙂
Rad says
The higher the number, the finer the grit of sandpaper. You could use courser 100 grit sandpaper to knock off the splinters, then finish with 220 for smoother finish.
Anonymous says
Thank you, I know what is means and that's what I was hoping would work.
Jengagiant says
What a great job! You can also get the original Jenga Giant if you're lazy about making it yourself or you don't have what you expected to play with 100% effectiveness. A hug!
Nick says
This is awesome!! I’ve been wanting to do life size jenga for a while now and this is definitely giving me some motivation…I even have some glow in the dark paints and never would of thought of those for it! Thanks , hope your baby girl and everyone else is well!
Anonymous says
I would recommend sanding the boards before you cut them, then sand the cut ends afterwards, saves a lot of sanding.
Anonymous says
+1
Daniel Leamon says
You are correct. Why not sand them to 220 grit or finer?
wayne ledbetter says
You need to consider if you paint them they may not slide as desired. A thickness planer will elimate the need to sand the 3 1/2" sides but not the 1 1/2" sides. Planing them to 1 1/4" would make them lighter as well. Use caution playing as the whole stack is quite heavy.
Anonymous says
2x4 are actually 1 1/2 x 3 1/2
Mark Collings says
Maybe I’m a little stupid owing to my use of metric language, but can someone please tell me how you can cut these blocks 10 1/2” long when the pieces are 4” wide? Surely the pieces should be 12” long?
Nikki Gladd says
Hi Mark, The 2x4's are 8 feet long. 🙂
Steve White says
A 2x4 is actually 1 1/2 x 3 1/2
Anonymous says
2 x 4 is what the board starts out a it finishes to around 1 1/2 by 3 1/2
Aln kirkwood says
Just wondering if a thickness planer would leave a smooth enough finish so that I wouldn't need to sand. The blocks would all be uniform as well.
Nikki Gladd says
Hi! No, unfortunately, you could still get splinters and need to sand.
ramanath says
Is it any wood that is available for cheap price? or do you recommend some special kind of wood
Nikki Gladd says
Hi Ramanath -- we just use 2x4's from home depot. Nothing special! 🙂
bella bregar says
do you have to stain them or can you paint them.
Nikki Gladd says
We didn't stain or paint them, but you can. It's really up to you!
Brigette W says
Hello and thanks for this post! My husband and I are going to be making this and wondered if you sanded all sides, including the top and bottom of each piece, or did you just sand the edges?
Nikki Gladd says
Hi Brigette,
We sanded all sides on a spindle sander, but you can use any sander. 🙂
Kathy says
They look best stained and varnished. Wr used 2x3 cut at 7.5"
Louise Clark says
You are so creative. These yard games look so fun. I’m sure the giant Jenga would be a hit, not just for the kids, but the adults as well.
Ricky C says
My wife and I made this game and its soooo awesome! We stained it after with a light wood tone coat. Our friends love it. Whenever we have a bbq or game night we all play drinking games. My wife also found a more green cork version of the blocks from a site called Tumbling towers. We love the wooden blocks we made, but the cork version is lighter to put away. Such a great idea thank you!! wish i could post some pics of all us playing 🙂
Nikki Gladd says
That's so great, Ricky! Thank you for letting us know. 🙂 If you want to share some photos, you can post them to the Seeded at the Table Facebook page! Would love to see them!
Larisa says
Where do you find the green cork? Used google and could find it that size?
John Dalquist says
Wow, this is a GREAT idea! Since I have the tools around we can definitely get the project done asap. What a great party or group game. Thanks for the idea!