

Our LEGO room is our favorite room in our house right now. It has perfect LEGO storage and awesome LEGO decals. We've already built various LEGO sets in it together, our favorite being the LEGO Disney Castle.
We're giving you the step by step for how Ben built the LEGO desk in our LEGO room and hope you can use some of these ideas for your house, too!
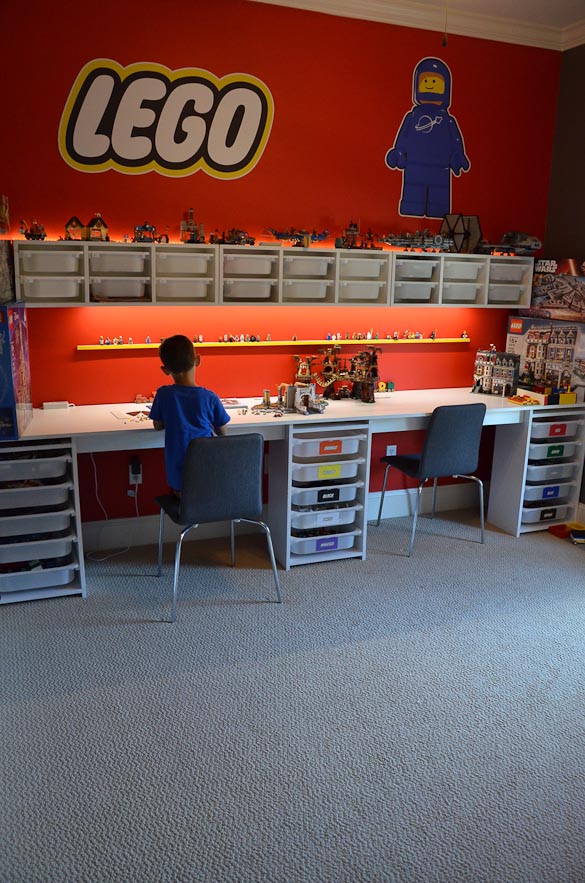 It's no secret that we love everything to do with LEGO, so when Simon moved out of his nursery and into Judah's room we decided to make his old room a LEGO room! Ben built the built-in desk for us to sit and build LEGO sets and we can also clear it for other family activities, like puzzles and homework. Ben wrote the rest of this post to show you how he did it.
If you love LEGO, too, make sure you check out our LEGOLAND Florida Resort review from earlier this year!
How to Make a LEGO Room
Step #1: Paint the Room
Paint the LEGO room. I found a Sherwin Williams color that’s close to LEGO red (SW 6869) and a grey that matched (SW 6005). I painted one wall red, and the three other walls grey.
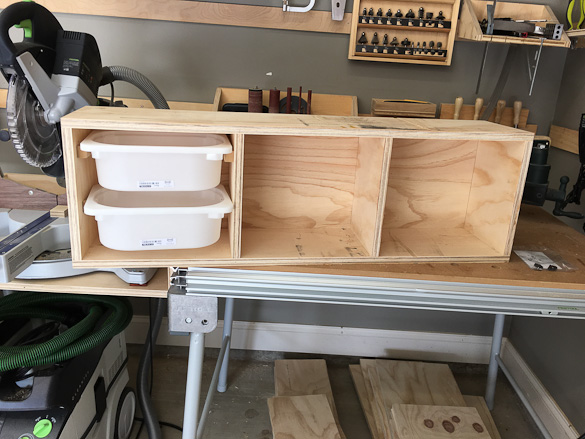
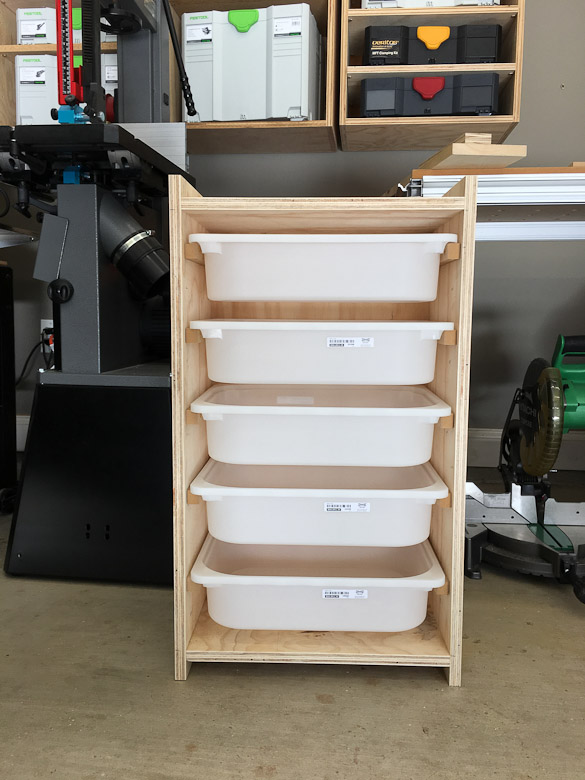 Step #2: Build/Purchase IKEA TROFAST System
The toughest part of this LEGO room project was building and painting the cabinets for the plastic LEGO storage bins. I measured the length of my wall and built the cabinets accordingly.
Fortunately, these storage cabinets can be purchase at IKEA under the TROFAST system. The TROFAST bins run about $3 for the larger ones and $2 for the smaller ones. The TROFAST vertical organizers are $30 a piece, and the horizontal ones are $28.
 If you are building the cabinets for your LEGO room, be sure to prime the wood with an oil based primer on the plywood. Then, paint the cabinets with a bright white to provide a nice contrast with the red and grey walls.
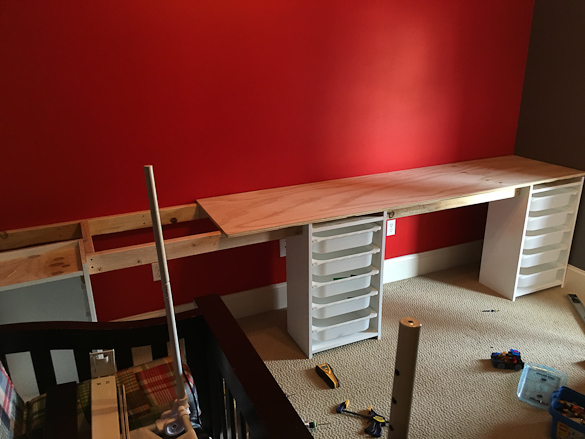 Step #3: Build the Top of the LEGO Desk
Prime (oil based) and paint the top before you install the top. The ¾” plywood top needs to run the entire length of the wall. Mine was about 2 feet wide and 12 feet in length. Your wall probably isn’t square, so you may need to transport the top a few times to and from your workshop. I built a frame out of 2x4’s that I affixed to the studs in the wall. Once the frame is installed, attach the ¾” plywood top. I attached the top from underneath, so I purchased 4” screws. The edge of the plywood will be exposed, and you’ll want to put a wood face frame on it.
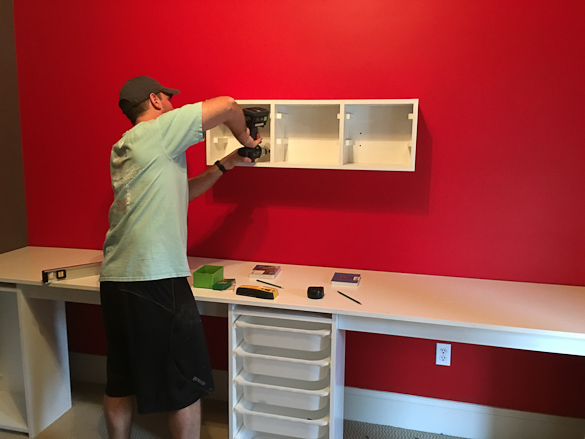 Step #4: Attach Upper Cabinets
Locate and mark your wall studs. I attached the cabinet right into the wall studs for strength. You’ll need a partner to hold the cabinets while you drill and screw.
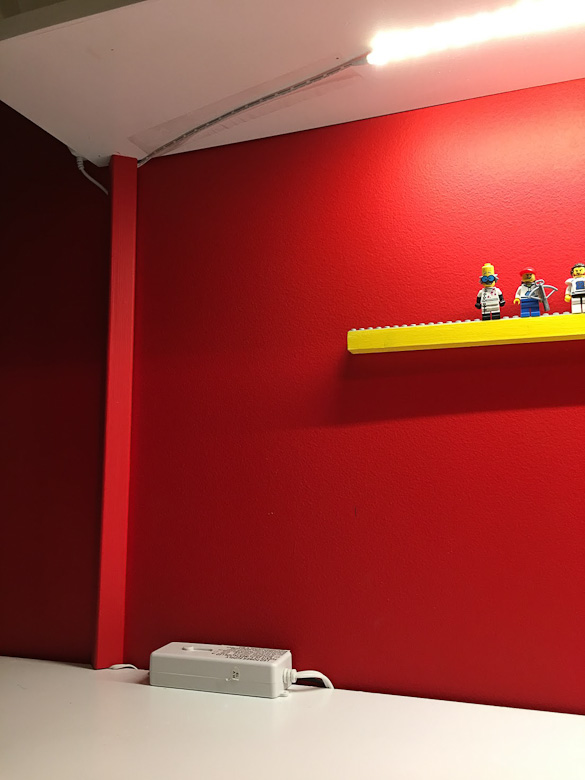 Step #5: Run LED Lights
I ran LED lights on the top and bottom of the upper cabinets. You could probably run both lines off one switch, but mine runs on two separate switches.
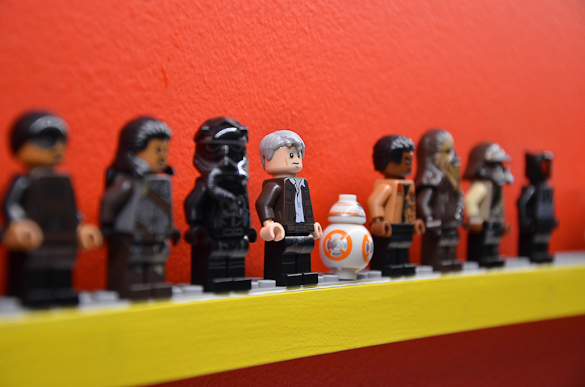 Step #6: Build a LEGO Minifigure Shelf (inspired by Jedi Craft Girl).
Buy a ¾” x ¾” wood strip at your local Home Depot or Lowes. Prime and paint it a bright yellow. Buy a “LEGO Classic Gray Baseplate” and cut it into strips with a sharp knife. Super glue the gray strips to the painted LEGO minifigure shelf. Screw the minifigure shelf into the wall studs. I used a brad nailer, however.
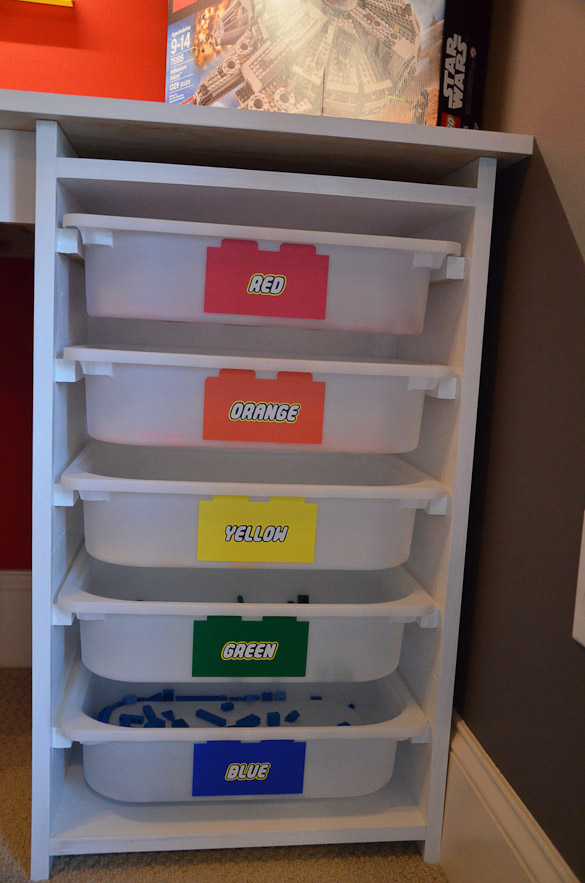 Step #7: LEGO Wall and Storage Decals
The large wall decals were the most time-consuming part of this project. You can’t buy the wall LEGO decals, so I had a local designer create them. I then hired a local company to print them on a canvas sticker of some sort.
We also found an Etsy seller for the LEGO storage bin decals (pictured above). The bin decals are great for sorting!
 Step #8: Become a LEGO VIP Member and LEGO Hunter
Now you need to fill your LEGO room with LEGO bricks! Becoming a VIP member is free on Lego.com, and it comes with all sorts of benefits. It’s a no brainer. I also cast a net on local Facebook garage sale pages. I snagged several great deals for LEGO sets and loose LEGO bricks! Be sure to wash used LEGO bricks with soap and water, though.
LEGO Room inspired by DroomManGroup at Euro Bricks.
Visit LEGOLAND Florida
Are you a big LEGO fan? You should visit LEGOLAND Florida theme park! Read our articles below about our visits to LEGOLAND!
- LEGOLAND Florida Resort Review
- LEGOLAND Florida Beach Retreat
- LEGOLAND Florida Beach Retreat Bungalow Room Tour
- LEGOLAND Dubai

Kathy says
What are the dimension four the cabinet and the spacing you used for bins
Jonathan Gordon says
I love your lego room. Where can I find that?
Robin says
Was inspired by your work and made my own! Would love to share it with you. Thank you for the ideas!
Nikki Gladd says
I would love to see!! Can you email me photos? [email protected] 🙂
Jennie Miller says
I love this desk and want to create it for my boys. Do you have a cut list for size of the boards that you used?
Nikki Gladd says
Hi Jennie,
The best measurements we have are within the blog post. We had a house fire last November so no longer have this LEGO room otherwise I would offer to do some more measuring for you!
Vera says
Hello,
Looks great!
Can you tell me where you found the LEGO logo?
I have been looking for a while.
Gr
Vera
Nikki Gladd says
Hi Vera, A local friend designed it for us and we printed at a local print shop.
Johnny says
This is awesome, what thickness was the wood you used for the cabinets on the bottom...thinking 1inch birch perhaps?
And curious on the dimensions of those base drawer units.
Johnny
Nikki Gladd says
Hi Johnny,
The thickness of the cabinets is 3/4-inch cabinet grade. The dimensions of the base drawers from IKEA are 16 ½x11 ¾x4 ". Hope this helps! 🙂
Dana says
This looks awesome! Would you mind sharing the dimensions of each shelf along with where you put the drawer holders? Thanks so much! We’re hoping to build one for Christmas for he boys!
Nikki Gladd says
Hi Dana,
This is from Ben: horizontal shelf: 36 5/8x8 1/4x11 3/4 ", vertical shelf: 17 3/8x35 7/8 " I hope this answers your question!
Tom says
Wow, great project! Thanks for sharing. Do you have a cut list you could share?
Thanks
Tom
Becky says
Love this room so much! I’d like to know how to get the spaceman and logo artwork shown above the cabinets.
Nikki Gladd says
Hi Becky! Thank you! We commissioned a friend privately for the design and had a local print shop print it for us.
Craig says
Great posting. I made this for my son, and it turned out great! Only comment is that I made the desktop 12' long and had to make the top from two six foot 3/4" ply wood and then filled and sanded the joint. I also used oil based paint to make a durable glossy finish. Was wondering what you did for the top, to give it a finished look? Thanks for posting this desk we will really enjoy it!
Nikki Gladd says
Hi Craig! Thanks for your feedback. I'm so glad this post could help! As far as the top, we used a semi-gloss Latex paint (Behr). Ben painted it several times to build up several layers. 🙂
Leila V Waddell says
Hi, I love the set up, we may do something similar for my son's room. Did you have to get a counter high chair?
Nikki Gladd says
Hi Leila, Nope! They are just regular desk chairs from Target. 🙂
Anonymous says
Thanks.
Laura says
Absolutely love this Lego area! Hoping to recreate it. How high is the counter off the ground?
Nikki Gladd says
Thank you, Laura! The desk height is 32 inches. 🙂
Theresa Smith says
This room is just awesome! I don't have a full room available, but I have carved out an area for a table and the bins. (just over 6 feet wide). I was wondering if you might have the dimensions Ben used for building the Trofast cabinets and the brand name of the LED strips he used?
Thanks,
Theresa
Nikki Gladd says
Hi Theresa, Thank you! How fun that you are able to have an area carved out for a LEGO table. 🙂 Ben used the same dimensions as the Trofast system but made it a little shorter height (32") and the entire desk is about 12 feet. The LED strips we used are Topmax but he said any brand is fine.
Maryann says
How tall are the cabinets under the desk?
Nikki Gladd says
Hi Maryann. 32 inches. 🙂
Holli says
This room looks awesome! For the trofast system under the table: did you use the vertical trofast storage system at IKEA? I was at IKEA today and it looks like the hight is 37 1/8 inches which is higher than yours. Thanks in advance!
Nikki Gladd says
Hi Holli,
My apologies for the late response! Ben custom built them and we only bought the storage boxes from IKEA -- not the whole system.
Natalie says
Looks amazing! We have an entire room dedicated to legos in our home but I've been trying to decide how to make it look cute like this. I was wondering what the estimated cost of having your husband build the cabnets? I would need a lot of them since have a crazy amount (over 300lbs) of legos. Thank you craigslist for the good deal. The only problem is that there are so many know it would be a lot of money if I just purchased the cabnets since I would need so many. Right now we have them organized in the plastic drawer containers from walmart which works but isn't as nice on the eyes as your lego room. Thanks for the inspiration.
Natalie
Nikki Gladd says
Hi Natalie,
We don't have the exact amount, but Ben said it cost us about $600 for the whole room, with about $250 for the shelving and $100 for the bins. It's a rough estimate, sorry!
Christina Keener says
Wow!!! Your Lego Storage Play room is awesome! I was looking up new setups for the Ikea Lego storage and was surprised to see my stickers on your pin After 3 years of selling the stickers I am finally going to organize my boy's Legos, lol
Thank you for adding a link to my Etsy TypoRific store
Nikki Gladd says
Thank you, Christina! Glad you like the room. 🙂 Your stickers are perfect for it! Good luck with organizing your boys' LEGO's! 😉
Tara Caravello says
Hi!! I tried to click on the link for the drawer labels, as we are trying to recreate this storage system, however, the link did not work. Do you still sell the labels? Could you possibly provide the link Christina?
Thank you!
Lauren says
Christina, I would love to order these from you but can not find your Etsy store. Please post a direct link! Thanks
Amanda Woodward says
Get one of those mesh laundry bags for washing delicates and put the legos in the bad. Then you can just thrwo them in the dishwasher on the top shelf and they get all nice and sanitized!
Nikki Gladd says
Great tip, Amanda! Thank you!
Anonymous says
this is awesome
Liz Williams says
this is incredible! I'll have to show this to my husband, he's a lego obsessor and he's getting the boys into it as well. I love the idea to have all the removable 'drawers' built into the side of desk for putting all the legos in. Genius!
Susan Gladd says
I love reading about the process of building this illustrious LEGO room, Ben.
sheila says
OH my goodness!! This is awesome. I have to show this to my second son Luke who to this day (he's 16) would love to have that room!!
Laurie Sotro says
Ben and Nikki, Wow! This is the coolest!! A. MAZ. ING.